Want to learn how to do a windmill? We got you covered. The windmill: this is a basic power move that you’ll see in many battles, cyphers, and showcases. It’s a fundamental move that all breakdancers should learn when they’re first starting. And for good reason: it’s a highly versatile move that can be combined with so many other moves, with loads of room for adding your style and flavor to it.
This is why learning the windmill can be so beneficial to breakdancers regardless of their skill level because it gives you a good foundation for you to continue building on your craft.
What Is a Windmill?
The windmill, or the mill, is a popular breaking power move where a dancer rolls their body in a constant circular motion on the floor, relying on the support from their arms, shoulders, chest, and back.
Even though it looks complicated at first, it’s a basic power move that isn’t too difficult to learn with time and dedication. So, find some space, grab some water, and let’s get started!
How to Do a Windmill in 3 Steps
The windmill requires strength in your arms, core, legs, and hips, and may take some time for you to get the hang of it. However, it’s one of the easiest power moves in breaking compared to other, more advanced moves. It forms the foundation for other power moves offers you the basic strength and gets you comfortable with the swinging motion required for more advanced power moves.
Some helpful exercises and “prerequisite” moves to help you make the windmill a breeze for you are the turtle freeze, also known as cricket freeze and backspin.
Before practicing, remember to warm up your entire body to prevent injury, not forgetting your wrists and hands too. To develop flexibility for the windmills, the seated straddle stretch can help.
It will also help if you wear clothes that cover your shoulders and legs to make it easier to spin, as well as practicing on a smooth surface.
Step 1
This is to do a windmill in a counterclockwise direction.
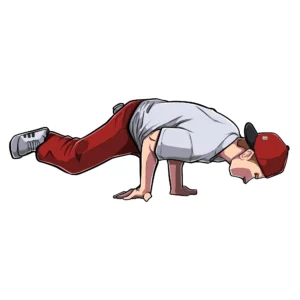
First, get in the turtle freeze position: take your left arm, tuck it in towards your belly button, keeping it tight against your armpit, and place it on the floor. Place your right arm on the floor around your shoulder. Keep your core tight with your legs extended behind you, slightly beyond shoulder-width length. Keep your legs off the floor, you should aim to get your body almost parallel to the floor. If you can’t get your legs off the floor, practice with your tip-toes against the floor.
Step 2
Once you’re in the turtle freeze position, take your left leg and swing it under your right leg. Then, flex your left arm to keep it tight, and push away slightly with your right arm, causing you to roll across your body from your left shoulder towards your right shoulder (keep yourself on your shoulders if you can).
Your arms are helping you with this motion, so here’s a breakdown of what your arms are doing. Since you’ll be spinning towards your left (counterclockwise), you’ll be pulling your left arm in and pushing away from your right arm, to help you roll across your shoulders.
Since you spin towards your left, you’ll pull your left arm in and push away from your right arm.
Progressively increase the speed for this part until you get comfortable, and try to do it with your toes lifted off the ground.
To build momentum with your legs, you need to swing your left leg while your right leg shoots up as you go with your body onto your shoulder. The faster you kick, the more momentum you’ll have. If you struggle with this part, you can try it slowly to get more comfortable with the leg swinging motion.
Remember to also keep your hips high and back straight as you roll across your shoulder.
Step 3
Now, this is where you get up again after you roll across your shoulder, which will then help you continue doing multiple rounds of windmills.
As you are rolling onto your right shoulder, your left arm is in the turtle freeze position, but now your right arm is in a tucked-in position. Your right arm is what allows you to roll back and ease yourself back into your turtle freeze position, with your left arm supporting you again.
By allowing your legs to move ahead of your upper body, you’re able to generate momentum which lets you continue your windmills.
Remember your goal is not to hold the turtle freeze. You can just see it as a “bridge” to help you continue into your next round of windmills. Another way of thinking about this is to roll from one side of your shoulder to the other.
Tips to Help You Learn the Windmill
- Get stronger first by getting comfortable doing the turtle freeze and backspin
- It helps to explore how to move in turtle freeze and balance on your shoulders
- Roll across on your shoulders so the movement looks tighter, and less sloppy
- Keep your feet on the ground if you can’t keep them up yet. It also helps you get used to the circular motion at first
- Get comfortable with the leg motion and generating momentum with your legs
- Building flexibility in your legs especially will help you learn the move more easily, but this is not necessary to help you learn the move at the start
You’ve Mastered the Windmill. Now What?
There are many styles and variations of the windmill. For starters, you can try learning the no-hand windmill, the baby mill, and the halo to continue pushing your breakdancing even higher.
You can also start exploring how to make the windmill your own and how you can inject your own style and flavor into it.
Learning and Taking Your Windmill to the Next Level
Learning the windmill without an experienced teacher guiding you can be extremely challenging.
Not to mention, you’ll probably run into a couple of injuries or have a busted pelvis after attempting it for hours on end. At this point, it’s common for dancers to give up on their windmill dreams, toss in the towel, and forget about ever being able to make the crowd go wild at a battle.
But it doesn’t always have to be this difficult (or painful!).
Here’s your chance to learn how to do a windmill in the shortest time with no pain at all. And who better to learn from than B-Boy Focus, a world-renowned breaker who’s won and judged the biggest battles over his 30-year (and counting!) career.
With his three-stage comprehensive course, this is your shortcut to nailing down the windmill in the most efficient and painless way possible.
As a special bonus, you’ll also be able to get personalized feedback from B-Boy Focus if you’re the first 50 students to sign up.
Join the ultimate Windmill Mastery course today and very soon, you’ll also be able to nail this move in no time just like the dozens of students who’ve taken this first step to breaking greatness.

